
In this article you will Learn how to convert your Osclass Website to android apk.
Step by Step Guide to Change website to Apk -
How to use WebViewer to Convert website to App
Step 1 - Visit Kodular website and register your account and login in Kodular website - https://creator.kodular.io/
Step 2 - Select Create Project and type your Project Name and click on Next.
Step 3 - Now you can see Mobile screen is displaying on your screen.
Step 4 - Change Screen1 title to your website title - like OwnPetz - Free Classified Ads
Step 5 - From left side in search box type WebViewer , Select webviewer and drag it into screen 1.
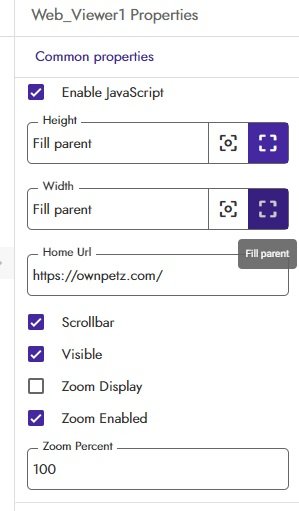
Step 6 - From web viewer properties in Height and Width Select fill Parent for both (as Screenshot) and unchek the Zoom Display option.
Step 7 - Type your Home url or Visit your website and copy and paste your home url (as screenshot) or you Can watch full Video Here - How to use WebViewer
Part 1 is Completed - How to use WebViewer. But when you live test your app , you can see your website is loading in app but when you press back button your app is being close. so now we will configure Part 2 How to Handle BackPress Button. If you don't know how to live test - you can check this video - How to Live test App in Kodular
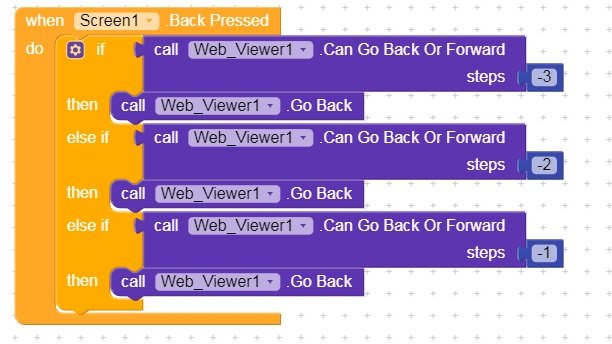
Part 2 - How to Handle BackPress Button
Step 1 - Click on Block option from top right.
Step 2 - Configure your block as below screenshot
Now Part 2 is completed How to Handle back button, we will again test our after configuration and now when you open some products from your app and after clicking back button you can see its working now.. but after clicking more back button you can see your app is automatically close or showing white screen error. So now we add exit button also. And you can also watch this full Video to Handle Back Button - Watch Video Here
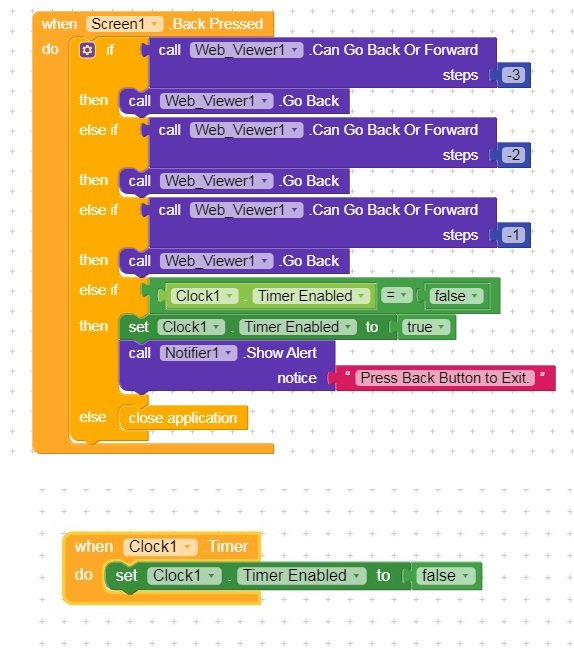
Part 3 - How to Create Exit Button - Press Back Button Again to Exit?
Step 1 - Click on Designer Tab from top Right and in search box from left side type Clock and drag it to screen1.
Step 2 - From clock Properties uncheck the Timer Enabled option and change Timer Interval to 1500 . (1500 means 1.5 Seconds)
Step 3 - Type Notifier in search box and drag it to Screen1 , We don't need to change anything in notifier properties.
Step 4 - Click on Blocks and as we already configured back button so we need to add little things here.
Step 5 - Configure Exit button as Below Screenshots , don't forget to disable clock option as screenshots..
Now Part 3 is completed How to create Exit button. You can watch full video for step by step configuration - Watch Video Click Here
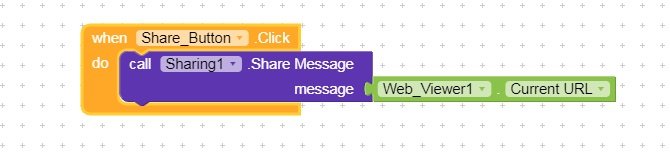
Part 4 - How to Add Share Button in Kodular App
Step 1 - Click on Designer Tab and type Sharing in Search Box and drag it into screen1. (No Changes in Properties)
Step 2 - Type floating Action Button in Search box and drag it to Screen1. And change Floating action Button name to Share_Button.
Step 3 - Now Share_Button Properties - You can change background color otherwise blue is default color. Elevation - 10 , you can change Icon Color to Red or as you want. and in Material Icon Name Type - share (this will change your Icon) . and Change Margin Bottom to 110 and no change in Margin Right default is 16. No changes in Advance Properties.
Step 4 - Now Click on Block Tab and configure your block as below screenshot or Watch full Video for Step by Step - Watch Video - Click Here
You can also watch full Video to Convert your website to Android Apk . In this Video All Topics Covered - Watch Full Video
To know more about our platform, visit our About Us page.

Comments